Engine Block Heater Installation (OEM cartridge style 400w)
This is my attempt to condense all of the engine block heater information (including pictures and installation instructions) into a single post. Hopefully having this info in one spot will help someone else down the road.
Mirage Engine Block Heater
The Mirage uses a cartridge-style engine heater that is installed into an existing cavity on the front side of the engine block. It is powered by normal household current. The “cartridge” is a cylinder-shaped resistance heater (about the size of a roll of dimes) that slides into an existing cavity in the engine block. Here’s what it looks like…

How does it work?
When you plug the heater in, the cartridge heats up a specific area of the engine block. The heat is absorbed by antifreeze in adjacent coolant passages. When you start the car, the engine coolant will be well-above the ambient temperature. You’re basically giving your cold car a head-start at warming up without the engine running.
Does it heat the oil, too?
Not directly. When the engine isn’t running, the oil is sitting in the bottom of the oil pan away from the engine block. Having warmer engine coolant may help bring cold oil up to operating temperature a little faster, but that is not the primary purpose of this type of block heater. If you live in a really cold climate and want to heat your engine oil, consider a pad heater applied directly to the outside of the oil pan. Check out something like a Kat's universal hot pad heater…

Is an engine block heater hard to install in a Mirage?
Not at all…it’s a moderately easy process. This is a “dry” type of heater…which means the heating cartridge doesn’t come in direct contact with engine coolant. This makes it simple to install and it will never leak. After you locate the hole in the side of the engine block, you literally just slide the cartridge in and that’s it. NO TOOLS are required, and it can be installed just by popping the hood. Set aside 30 minutes of time for a complete installation. After you do it once, you’ll be able to do it again in about 5 minutes! 
Why would I want to install an engine block heater anyway?
1) Better Fuel Economy: A block heater allows the engine to more quickly reach its normal operating temperature range. A warm engine consumes much less fuel. If you have a CVT, a quicker warm-up means your transmission will shift into high range at low speeds more quickly.
2) Reduced engine wear: Having the engine warm up more quickly can help reduce engine wear during the engine’s warm-up period.
Does it work?
Absolutely. A block heater won’t keep your engine hot, but it will keep it warm. For example, if my car is sitting in a 35 degree garage and I plug the heater in for 2-3 hours, the coolant temperature in my Mirage (using my Scangauge) is close to 100 degrees when I first start it.
Do I really need one?
That’s up to you. If you live where winters are cold and you have access to electricity where your car is parked, having an engine block heater can be a nice convenience. You’ll be able to hop into a cold car and the engine will already be moderately warm the second you start it…so there’s no need to let the car idle excessively to warm up.
If you’re a hyper-miler and you live in a cold climate, then you will definitely benefit from using one as you will immediately see lower fuel consumption as your engine gets up to operating temperature more quickly. We have a member who lives in Florida (3dplane) and he even uses a block heater on cold nights to help his cold-start fuel economy!
How big is a block heater?
The portion of the cartridge that fits into the engine block hole is 18mm in diameter and 70mm long. Here are a couple of images to give you a better idea…

What is the electrical requirement of the heater?
115 Volts AC (normal household outlet in North America). Much of the world uses 230 volts (Europe). One member has found some potential alternate heaters (230 volts) for use in these areas. Check THIS post.
How much electricity does it use?
400 watts.
How long does it take the heater to warm up the engine?
It doesn’t work instantaneously. You can’t plug it in for 10 minutes and expect your engine to be warm. It will take some time to work. If the car is sitting in a closed garage, you may only need to plug it in for 2-3 hours before you drive the car. Some people use heavy-duty outlet timers that supply power to the heater before their morning commute. If your car is parked outside and it's -20, you might want to leave it plugged in for several hours before you plan to drive the car.
Can I leave the heater plugged in while my engine is warming up?
No…the instructions specifically say NOT to do this as it could damage the heater. Besides…if you’re using an engine block heater, the whole idea is that you no longer need to let your car run to warm it up!
Where is this hole in the engine block where the heater is installed?
There is a cylinder-shaped cavity (about 18mm in diameter and 70mm deep) that has been cast into the front side of the engine block (the same side of the block where the oil filter is located). It’s literally right next to where the radiator hose connects to the engine. Here are some pictures to give you an idea where it is…
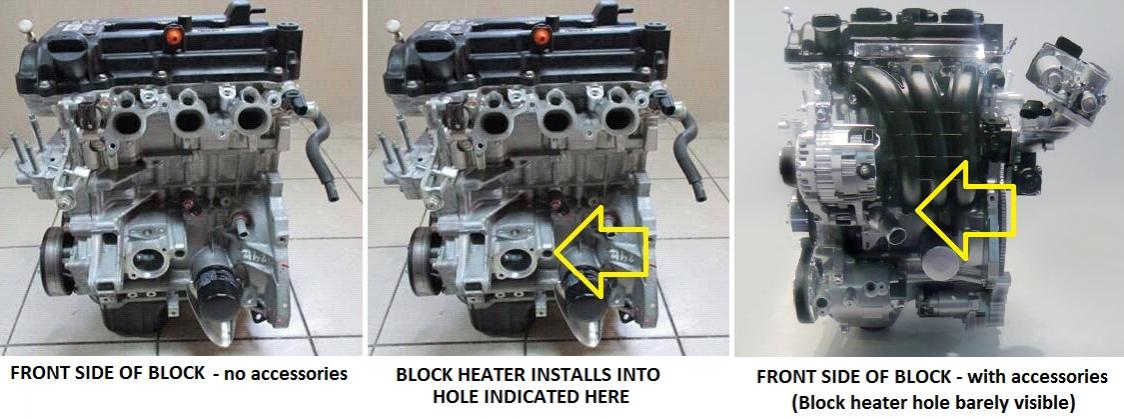
While this hole is easy to see in pictures of a bare engine removed from the car, it is not so easy to find once the engine accessories have been mounted and the engine is sitting in the car. When it comes time to install the heater, you will be doing it more by feel than by sight. The above pictures should help you understand what you are doing during the installation.
Here is the actual photo from the Mitsubishi instruction sheet...

Where can I get a block heater for my Mirage?
There are at least 3 sources for block heaters that fit the Mirage:
1) Kats part number 11812
2) ZeroStart part number 3100111
3) Mitsubish part number MZ314528 (Canada)
The Mitsubishi part number above is valid in Canada, but I can’t find a block heater listed on any US Mitsubishi parts websites. If someone has bought this part from a US Mitsubishi dealer, please let us know the part number and I will update this. Having seen pictures of both heaters, they appear to be very similar...if not the same.
The Kats 11812 heater costs about $30 from NAPA stores…or you can buy it on napaonline.com. Napa is the cheapest place to buy the Kats heater in the US. Kats manufactures engine block heaters for a lot of OEM applications…so don’t be concerned about it being an inferior part. UPDATE: I am told that Napa no longer carries Kats heaters in Canada. You guys in Canada may have to get it from Amazon.
NOTE: The Kats catalog shows part number 11812 as fitting some Mitsubishi models (like the Lancer/Outlander) but does not mention the Mirage. Don’t worry…11812 WILL fit a Mirage. The Kats catalog isn’t up-to-date.
UPDATE: Check post #32 for 2019 pricing at various sources.
Is there any difference between the Kats and Mitsubishi engine heaters?
The Kats and Mitsubishi units are both 400 watt cartridge heaters. The Kats unit includes the heater cartridge and a simple set of generic instructions applicable for multiple vehicles.
The Mitsubishi heater comes packaged with more detailed instructions and a few additional items to complete a proper installation including…
1. A small tube (about 0.2 oz) of dielectric grease
2. A few zip ties
3. A cap for the 3-prong plug
Once I have the block heater, what additional supplies will I need to perform the installation?
You won’t need anything if you purchased the Mitsubishi heater. If you buy the Kats unit, you will need a small amount of dielectric grease (no more than about .25 oz) and 3-4 zip ties to complete the installation properly.
The instructions mention using dielectric grease to coat the heater cartridge and hole prior to installation. What is the purpose of this?
The dielectric grease keeps moisture away from the heater cartridge and hole. It will also prevent the heater cartridge from corroding and fusing itself inside the block cavity. The cartridge fits very snugly in the hole with less than 1mm of clearance…so there is just a very slight film of dielectric grease between the heater and the engine block.
The instructions specifically mention using “NSCG” silicone grease? What is that?
If you search the web for NSCG dielectric grease, you’ll find 1 specific product under the brand name “Novagard G624”. This is available on Amazon for about $20 per 5 oz tube. FYI – that is a HUGE tube and has enough dielectric grease to install 50 block heaters! G624 is just normal silicone dielectric grease. There is nothing special about it. It is the same thing as the $3 tube of Permatex dielectric grease you can buy at AutoZone. They both have the same temperature range (-65F to +400F). I personally called the manufacturer of Kats block heaters and they told me any silicone dielectric grease is acceptable. So there’s no need to buy the huge, expensive tube of G624 on Amazon.
Some people on other forums are using this product on their block heater cartridges: Super Lube 98003. This is also a dielectric silicone (with a temperature range up to 500F) but it also contains a material to assist in the transfer of heat. You can’t go wrong using dielectric grease or this material. Note that dielectric grease is sometimes referred to as "tune-up grease" when it is packaged.
OK...So let’s get down to the actual installation process…
How to install a block heater in a Mirage
1) Locate the hole in the front of the engine block.
The best way to do this is by first watching the YouTube video that member wellswebdesign posted HERE
With the hood open, stand in front of the car and look straight down past the alternator plug (you may need a small flashlight to find it).
If you’re having trouble locating the hole, try this: Notice that the hole is right next to the point on the block where the radiator hose attaches to the engine. If you follow the radiator hose to the engine block, the hole will be just to the right where the hose and engine block come together. I can actually get the index finger of my right hand into the hole doing it this way (even though I can’t actually see it). Here’s a picture of the hole in my engine. Note that the only way you can get this view is by holding a camera down there and blindly photographing the area…

You need to locate the hole location now because you will be installing the heater cartridge by feel in the next few steps.
2) Clean out the hole in the block.
The instructions say to do this with compressed air. If you don't have an air compressor handy, try a can of computer compressed air. Another option is to pick up a cheap tube brush at the dollar store and run it in and out of the hole a couple of times. You probably won’t find any dirt in there to begin with…but you want to make sure there’s not some large chunk of stuff in there before going to the next step.
3) Coat the inside of the hole with dielectric grease.
Here’s how I did this…
Unplug the heater cartridge from the power cord (the orange end of the power cable will unplug from the heater cartridge). Apply a thin layer of dielectric grease to the heater cartridge. You do NOT need a lot. There’s almost no clearance between the heater cartridge and the hole. If you put a ton of it on the cartridge, most of it will get squished out of the hole as the cartridge goes in.
Now (by feel)…find the hole again and slide the cartridge into the hole. Here’s a pic of the cartridge half-way in the hole…

Do this a couple of times. This will not only coat the hole with dielectric grease, it will also help give you an idea of how the cartridge goes into the hole for the actual installation.
4) Coat the heating cartridge with dielectric grease one last time.
Remember…you don’t need a lot. A very thin, light coat is all that is needed.
5) Push the heating cartridge into the hole.
Reconnect the orange end of the power cable to the heater cartridge. Notice the metal clip on the block heater? Make sure that is facing straight up (12:00 position) as you maneuver the cartridge into the hole. See diagram below…this is how it should end up in the hole…

Push the cartridge straight into the hole until it won’t go any further. Remember that the cartridge only goes into the hole so far.
Once the cartridge won’t go in any further, the clip on the top of the cartridge should have grabbed onto the outside of the hole. If you pull lightly on the heater cartridge and it won’t come out of the hole, the clip is working and you have successfully installed it!
WARNING: Make sure the cartridge is in completely and won't slide out!
At least one Mirage owner has had this happen. The heater cartridge came out of the hole and was lodged against the plastic intake manifold. When he plugged the heater in, it melted a hole in his intake. Read his account here.
Here are pictures I took of my installed heater. Keep in mind I couldn’t see ANY of this with my own eyes! I literally held my camera down there and started taking random shots to get these photos…


Here's another photo of the block heater installed. I was able to take this picture when my front bumper cover was removed...

6) Route the electrical cord away from any hot or moving parts.
NOTE: If you purchased the Mitsubishi heater, the instructions say you need to remove the battery, battery box, and several other things at this point to properly route the heater power cable. This is a lot of extra work and is not necessary. You can easily route the cable almost anywhere under the hood without having to remove anything.
Grab your zip ties and use them to route the heater cable away from the engine. Now is the time to plan out WHERE you want the heater plug to come out on the car. For me, the most convenient spot was to route the plug out the lower front grille opening. I have the plug zip-tied directly to the grill…which helps tremendously when plugging/unplugging it. I can literally do it 1-handed because the plug can’t move very much. Again, THIS video from wellswebdesign gives you an idea of where you can route the cable.

You may be tempted to leave the plug under the hood where it is more protected from the elements. I didn’t do this. Raising the hood to plug/unplug the heater every morning seems like more trouble than it's worth...especially if there's 4" of snow on the hood!
OTHER TIPS:
Because I have my heater plug routed to the outside of the car, I spent another $5 on amazon and bought a plug cover (which is the same as the one included with the Mitsubishi heater). Here is the link: Zerostart 360-0012. You don't want the plug to get covered in ice so you can't plug it in!
I also use an extension cord with a lighted end. This is to help me remember that my car is plugged in before I drive it away! 
I'm into my second season using this heater. I now use it with a heavy duty timer so it turns the heater on automatically about 2-3 hours before I drive the car in the morning. This way the car is consistently warm when I first start it in the morning.
WARNING:
IF YOU HAVE AN ENGINE BLOCK HEATER INSTALLED, BE CAREFUL CHANGING YOUR OIL. THE OIL FILTER IS CLOSE TO WHERE THE POWER CABLE FOR THE BLOCK HEATER WILL BE ROUTED. IT WOULD BE VERY EASY TO BUMP INTO THIS CABLE WHILE REMOVING THE OIL FILTER...AND POSSIBLY DISLODGE THE BLOCK HEATER FROM THE CAVITY WHERE IT IS MOUNTED. IF THIS HAPPENS, THE HEATER COULD FALL OUT AND POTENTIALLY MELT ENGINE COMPONENTS THE NEXT TIME THE HEATER IS PLUGGED IN. THIS MAY BE WHAT HAPPENED TO THIS FORUM MEMBER.
---
Admin edit - related thread:
Testing OEM block heater: how hot after how much time plugged in?
Last edited by Top_Fuel; 09-16-2019 at 02:24 PM.
__________________________________________
 View my fuel log 2015 Mirage ES 1.2 manual: 52.2 mpg (US) ... 22.2 km/L ... 4.5 L/100 km ... 62.6 mpg (Imp)


 Puttster 2
 Reply With Quote

 Ermine

 Low buck tux
 I bought mine on Napa's website and it was less than $40 shipped to my door...and it only took 1 day to arrive.
 This is because the Kats catalog is not up-to-date and it doesn't recognize the fact that this part does fit a Mirage. Just search by part number (KAT 11812) without identifying a vehicle. Or, you can tell the website you have a 2015 Mitsubishi Lancer...then a search will find it.
 2015 Test Mirage
 Swarthy
 IntenseSpaceStar
