Page 1 of 4 123 ... LastLast
Results 1 to 10 of 36

Thread: DIY - Looking good for the long haul! (Rust protection front/rear wheel well areas)

Hybrid View

Previous Post Previous Post   Next Post Next Post
  1. #1
    Member
    Join Date
    Jul 2014
    Location
    Colton, NY
    Country
    United States
    Posts
    39
    Garage empty: add car
    Thanks
    5
    Thanked 38 Times in 14 Posts

    DIY - Looking good for the long haul! (Rust protection front/rear wheel well areas)

    --------------------
    Admin note
    -- this thread is part of a DIY series:
    1. DIY - Rust protection front/rear wheel well areas
    2. DIY - Rust protection front/rear doors
    3. DIY - Rust protection for the rear hatch
    4. DIY - Rust protection for the inner rear quarters

    --------------------

    Greetings Mirage owners!

    The following do-it-yourself article may be especially useful if you are one of the following:

    - A Mirage owner that gives their car at least one or two last looks before going into a store...
    - A Mirage owner that in secrecy has entertained the thought on hugging their new love!
    - A Mirage owner that is in this for the long haul and wants to keep "Baby Cakes" looking good for a long, long, time!

    The Mirage comes with an excellent warranty especially on the body - period. This should have captured the eyes of those living in the rust belt areas. As good as the warranty is though, taking a closer look at the wheel well areas on a brand new car does show room for improvement.

    The focus of this two-part series will be the front and rear wheel-well areas. Even if you are not a do-it-yourselfer, please read on as you may find it of interest.

    -------------------
    ***DISCLAIMER***
    -------------------
    What follows is the removal of the rear wheels to get a better look at what we're dealing with. The procedures for this write-up will be general and probably not all-inclusive so if in doubt about anything, ask questions or do a little research before you get in a pickle or something more serious. In the same way there are those who should never carry anything sharper than a nerf ball, there are those that should never attempt a hands-on repair to an automobile. Going one step further, please consider this writeup for entertainment purposes only - I assume no liability - CrazyJerry

    Moving on - Let's look at the rear first!

    -----------------------------------
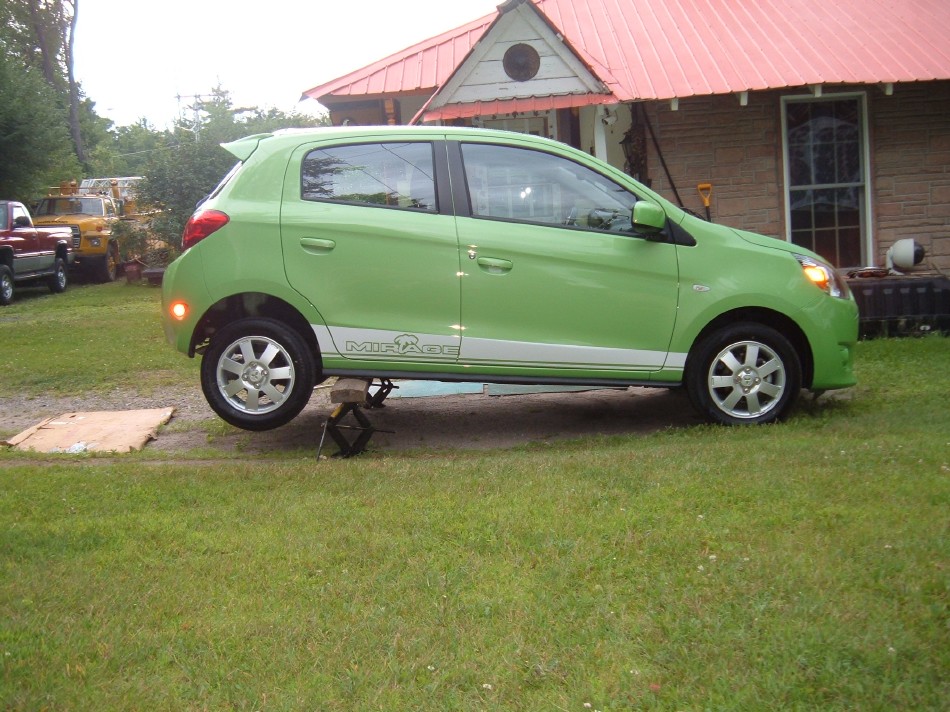
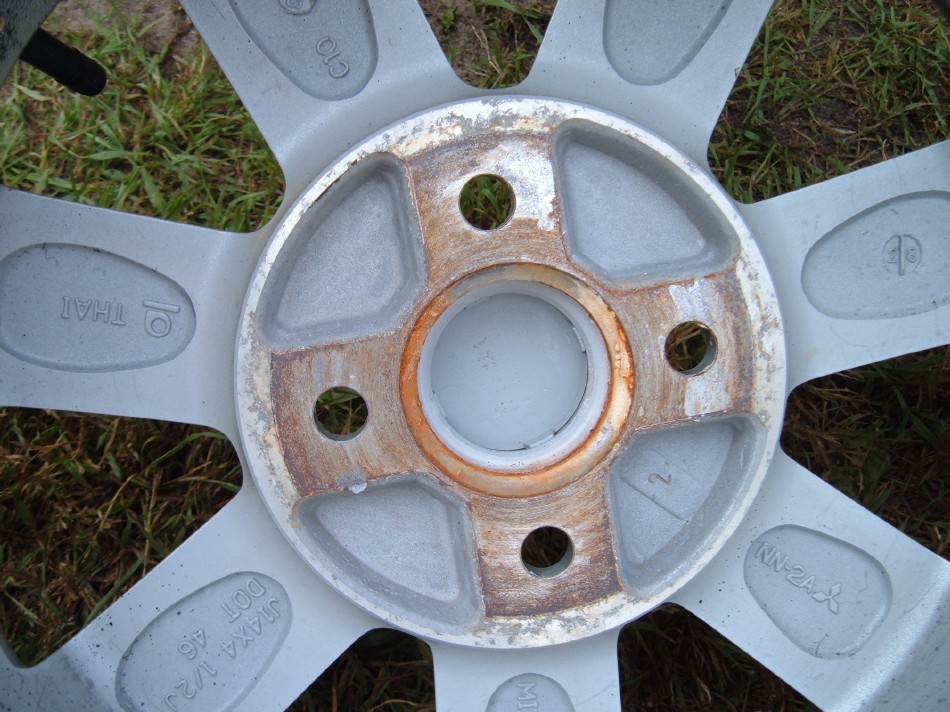
    153 miles - Do you see what I see?
    -----------------------------------
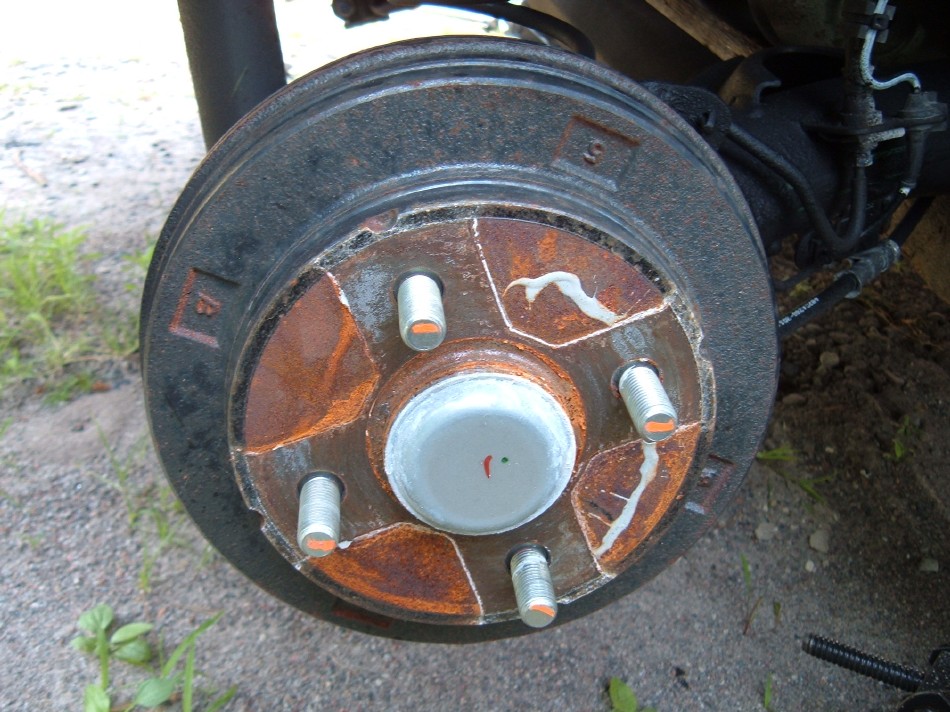
    What you're seeing hiding behind the alloy wheel is rust on a new brake drum. Give yours a look-over when you get a free second.


    This is not exclusive to Mirage and sometime when you're bored, scan the local dealerships and you'll see what I mean. Also, do not be discouraged! This is a wonderful opportunity to do something great for your car when it's still relatively clean and the time spent should be minimal.

    To get a better look at the problem the rear wheels must be removed. For factory alloy wheels, A 1/2 drive 13/16 socket will fit both the lug nuts and the hex head for the anti-theft lug nut socket. You could also use the factory tire iron. In fact, just for laughs you may wish to try this first just to simulate a scenario where you might have to change a tire on the roadside. I'm glad I did because although the anti-theft lug nut loosened easily, a few of the others did not. Literally standing on the tire iron and bouncing like a pre-olympic spring board dive would not crack them loose!!! They weren't corroded - just amazingly tight!


    At some point you will be victorious just cracking the lugnuts (a viking wail would be in oder at this time) and then you can raise the rear and remove the lugs the rest of the way and then the wheels.

    ** Raise the rear wheel(s) off the ground in a safe manner.


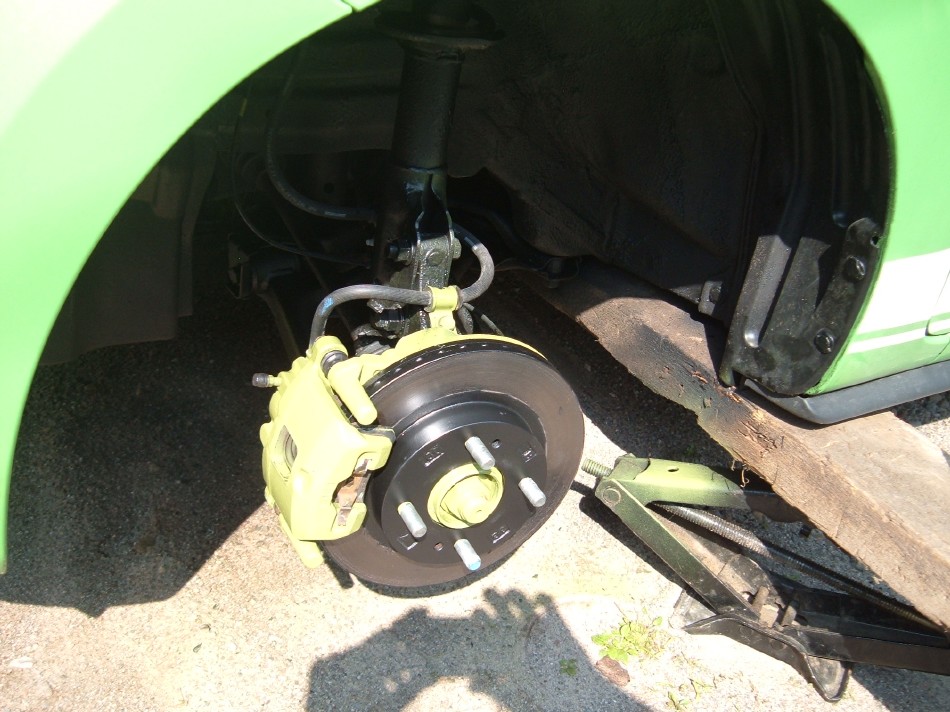
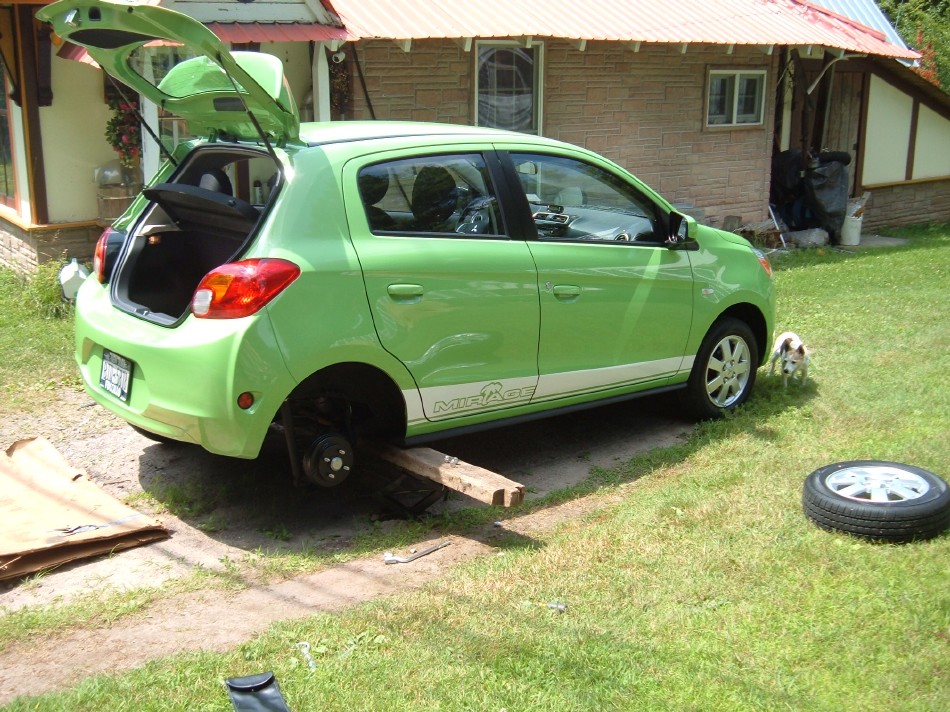
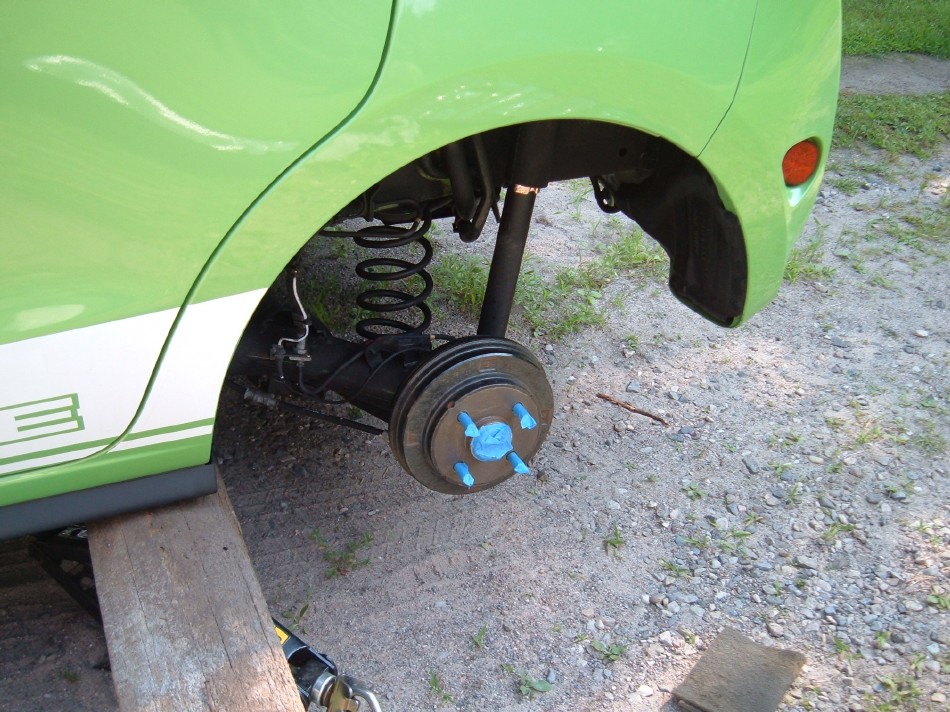
    With the rear wheel(s) off the view is much clearer:


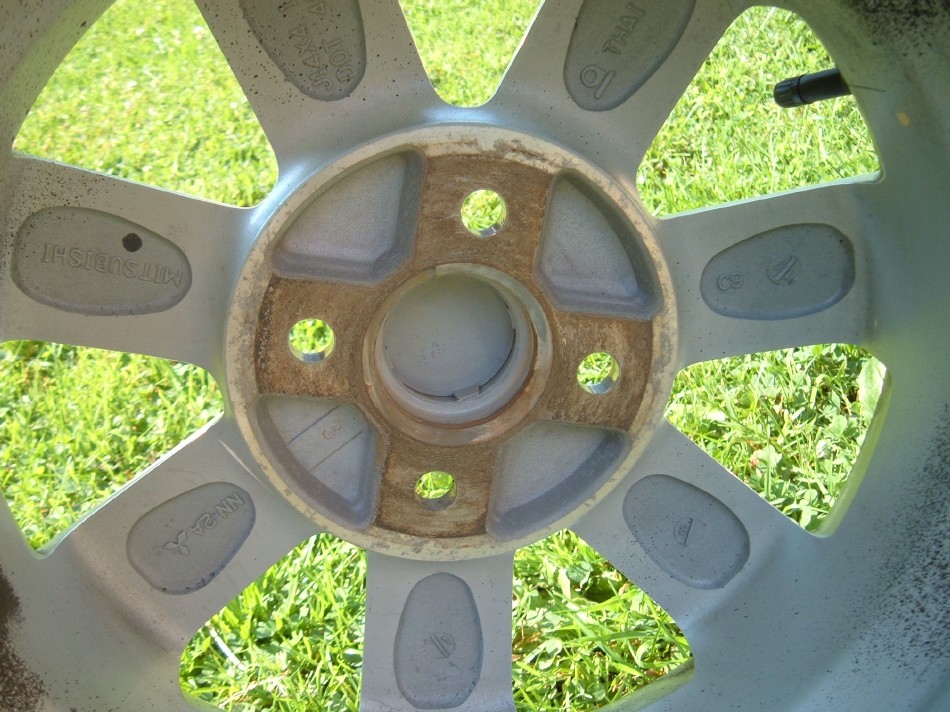
    While you're in the exploratory stages, take a look at the area of the wheel that contacts that rusty drum:


    At this early stage (153 miles) these cosmetic issues are very easily fixed! If left for an extended period of time (like years) they will likely be more than just surface scars.

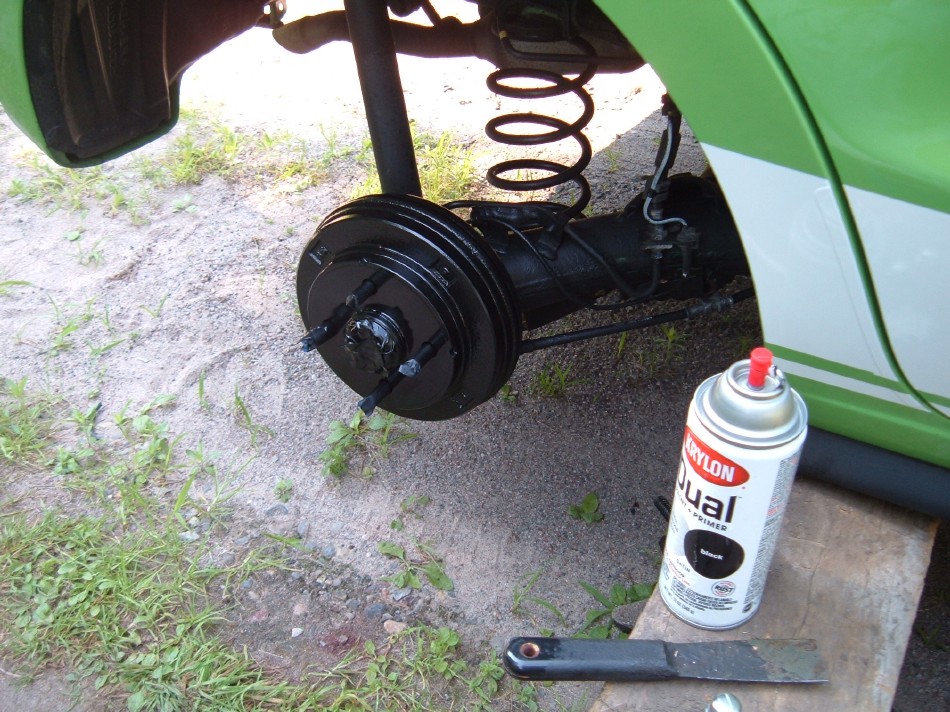
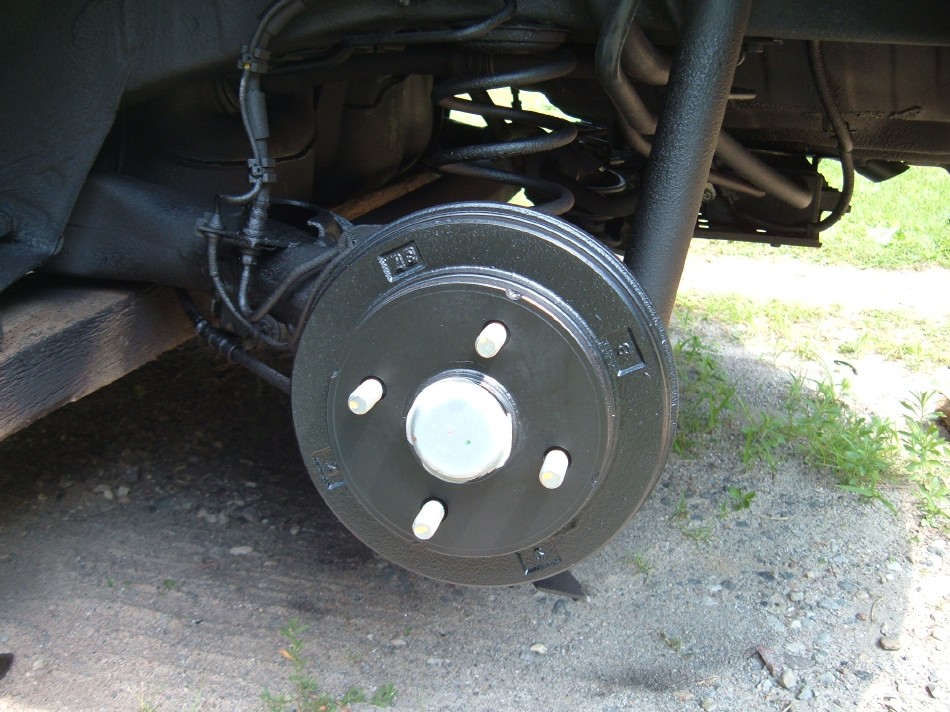
    For the brake drum, I used a standard putty knife to scrape away the rust around the wheel studs, and a gray scratch pad to cleanup the finer residual. The gray scratchpad with gentle pressure also worked well on the wheel-drum contact area.


    A final wipe with a rag and some surface cleaner removed the remaining rust-dust.

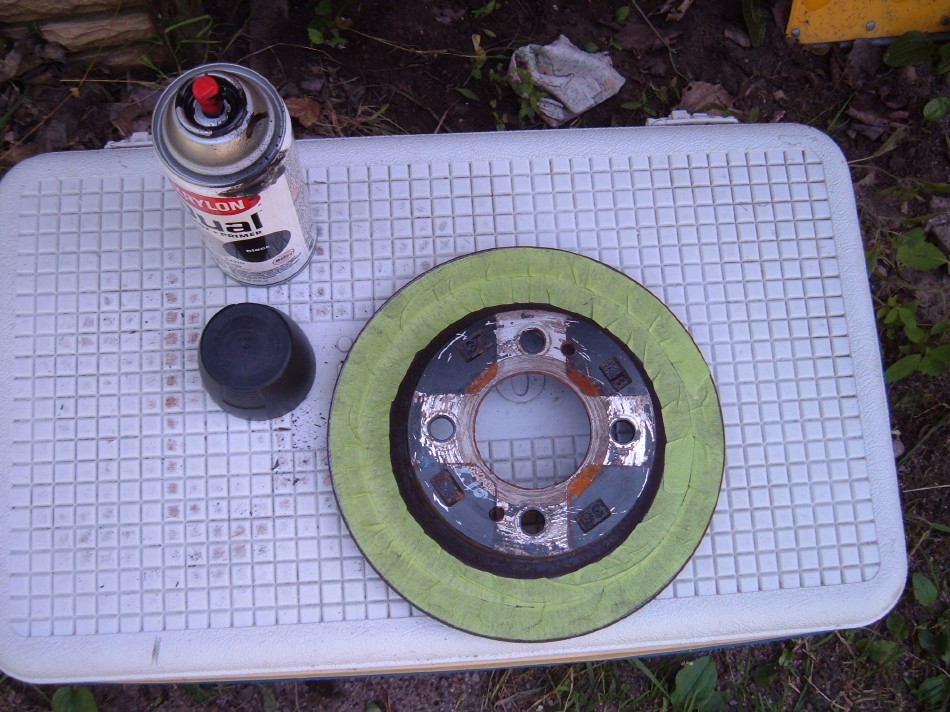
    Proceeding with my concourse restoration, I masked off the wheel studs with some "blue tape" like you'd find at the big box home improvement stores near you. This would ensure no paint would get on the threads while painting the brake drum.


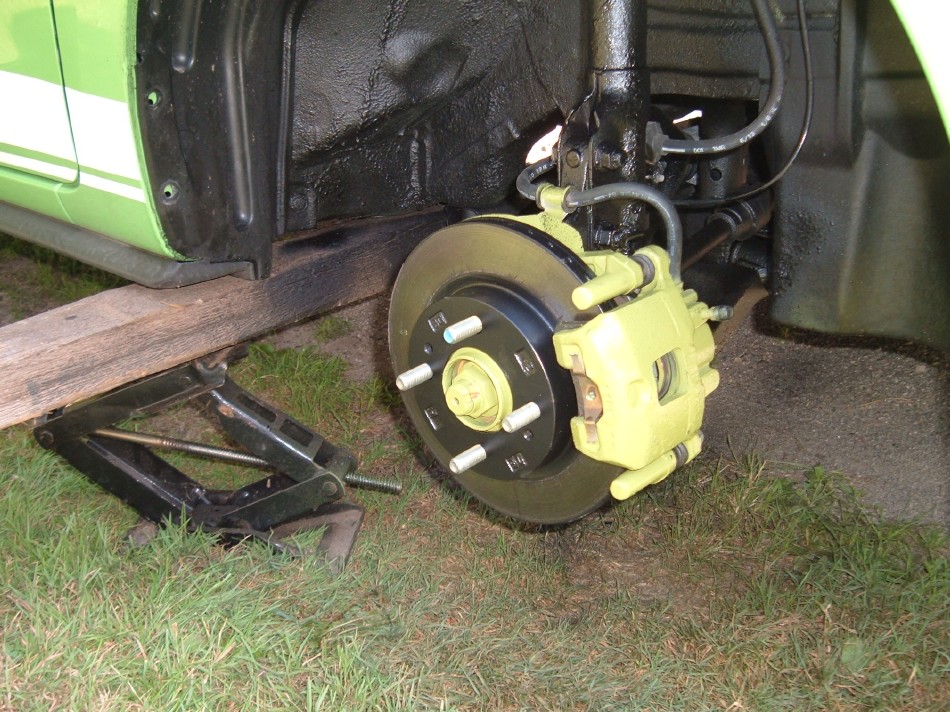
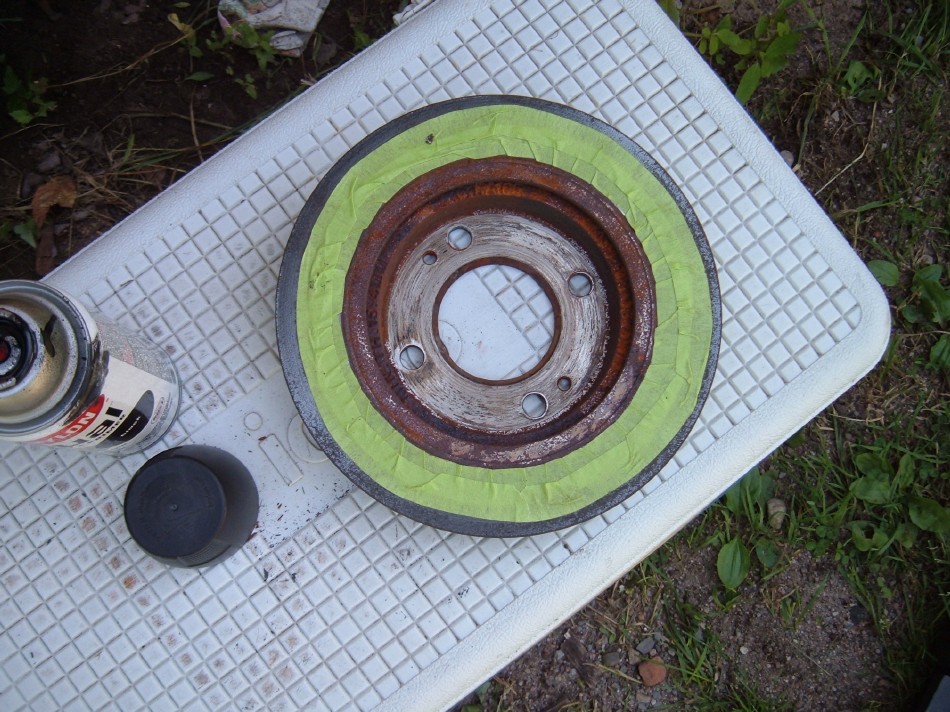
    In the past I've had good luck with some of the newer "rattle cans" of paint. For this job the drums got three decent coats:


    It was a great day and the paint was pretty much dry in 40 minutes:


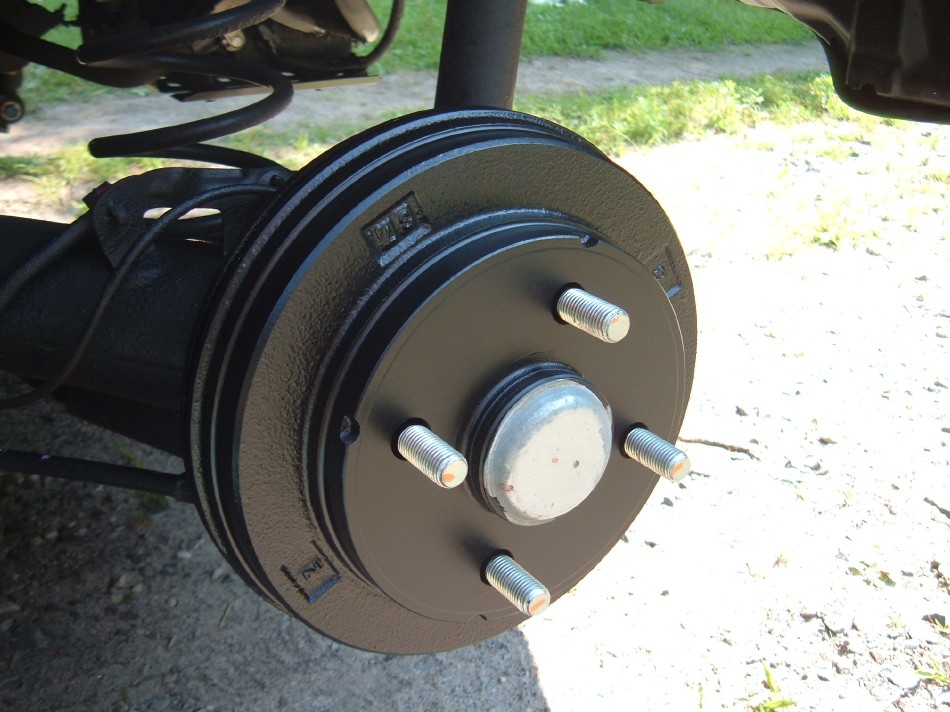
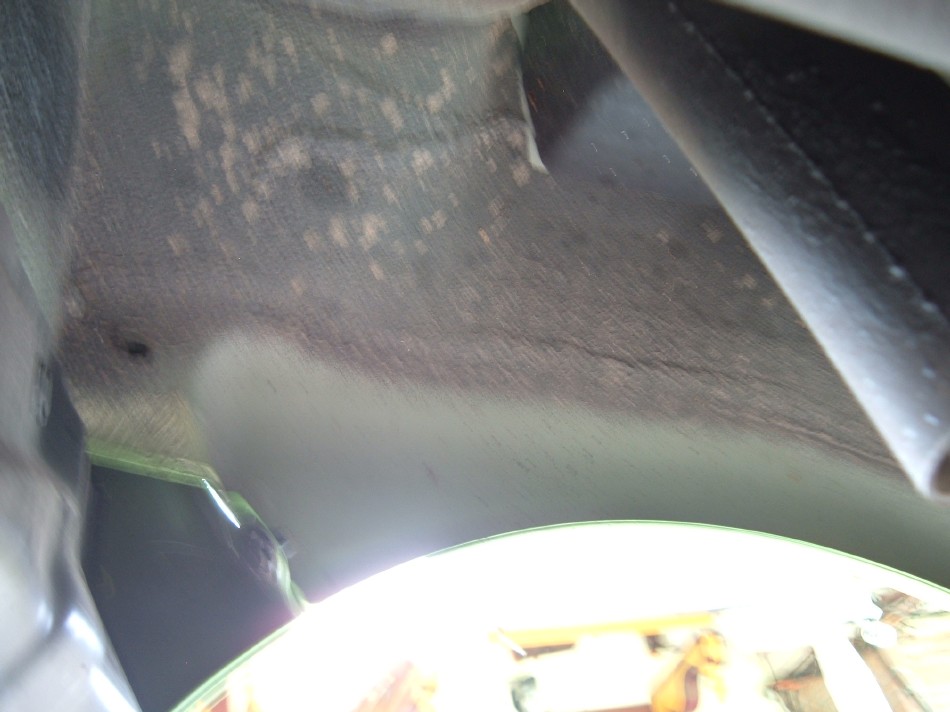
    But, we're not done just yet... Imagine for a moment you are the brake drum, you've just been cleaned and painted, and life is grand! Then you look straight-up:


    Here's another view:


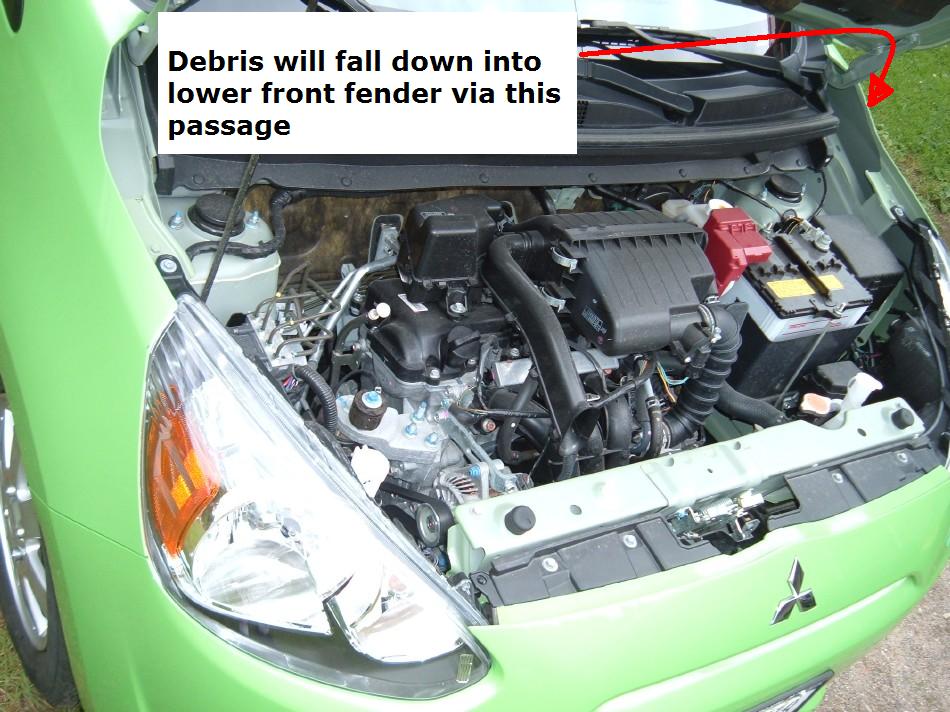
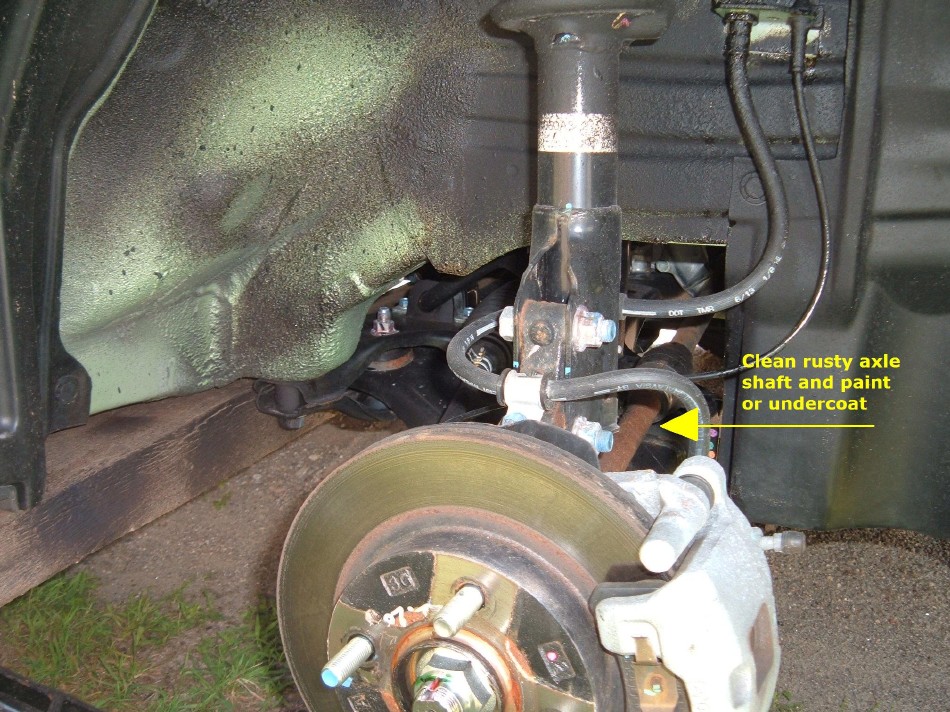
    In short, the undercoating in the wheel well does not extend all the way out to the outer edge. Is yours like this too? In fact, look at the rear axle, springs, and quite frankly everything and see what is and is not undercoated. Where we live (Northern, NY) you want it undercoated or it will rust. This is why we spend more on cars in our lifetime than our houses!

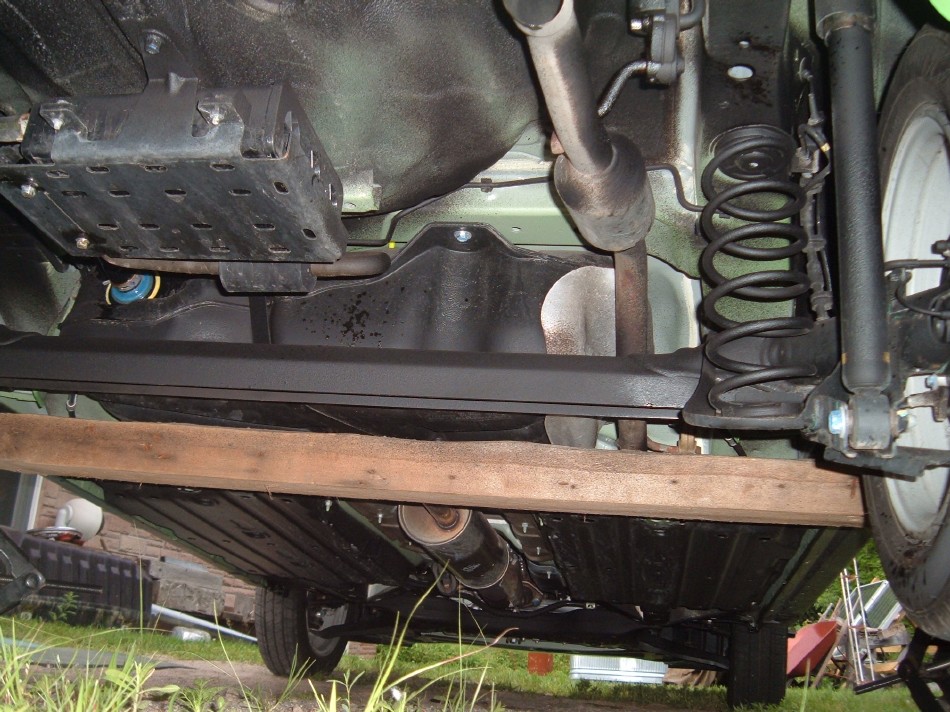
    For the rear I got 4 cans of 3M "Professional Grade" (whatever) undercoating. It sprays very nice, and you'd have to be half asleep in one spot to get it to run and glop to the ground. Everything that wasn't breathing got blasted.


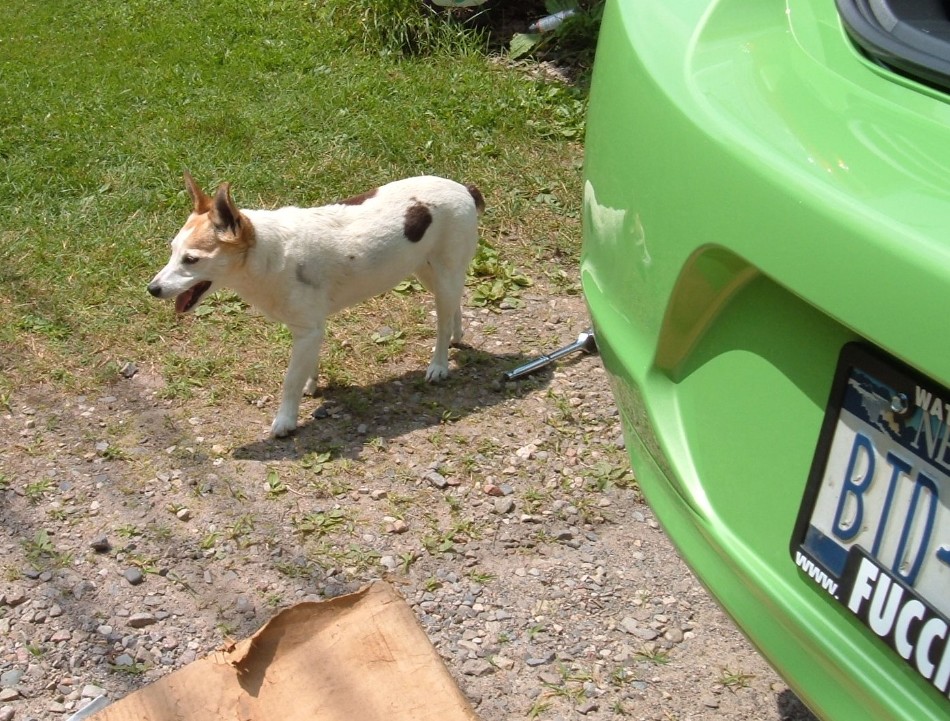
    It's always nice to have a little help. She may be only 15lbs but has a 200lb attitude! In three months toothless love-child will be 18 years old. Say hello to Dottie who always find her way into the photo shoot:


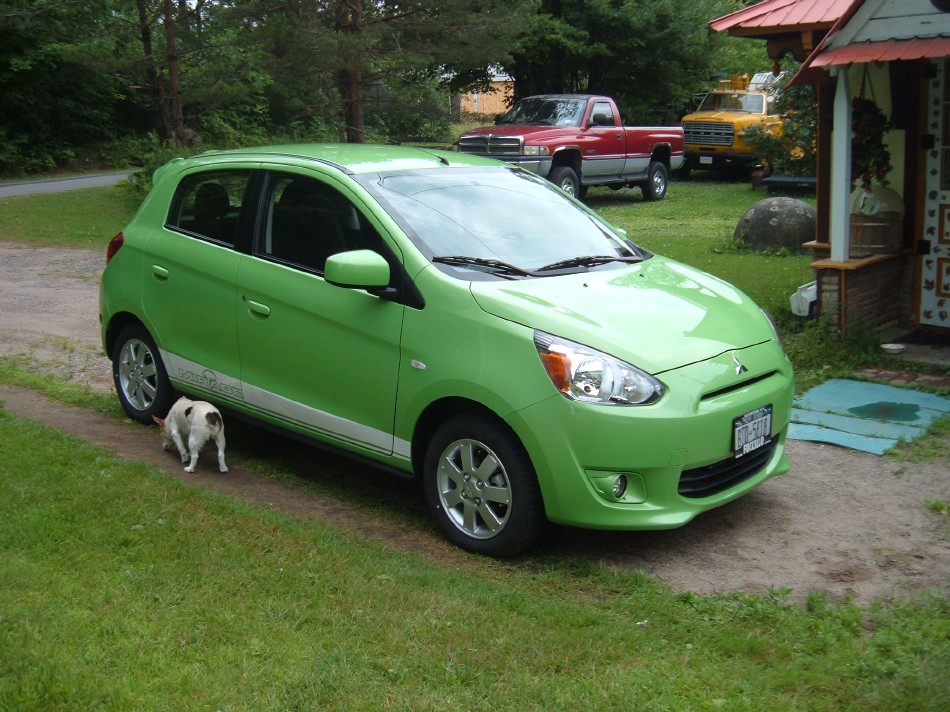
    In this photo both the rear and the front are looking at you:


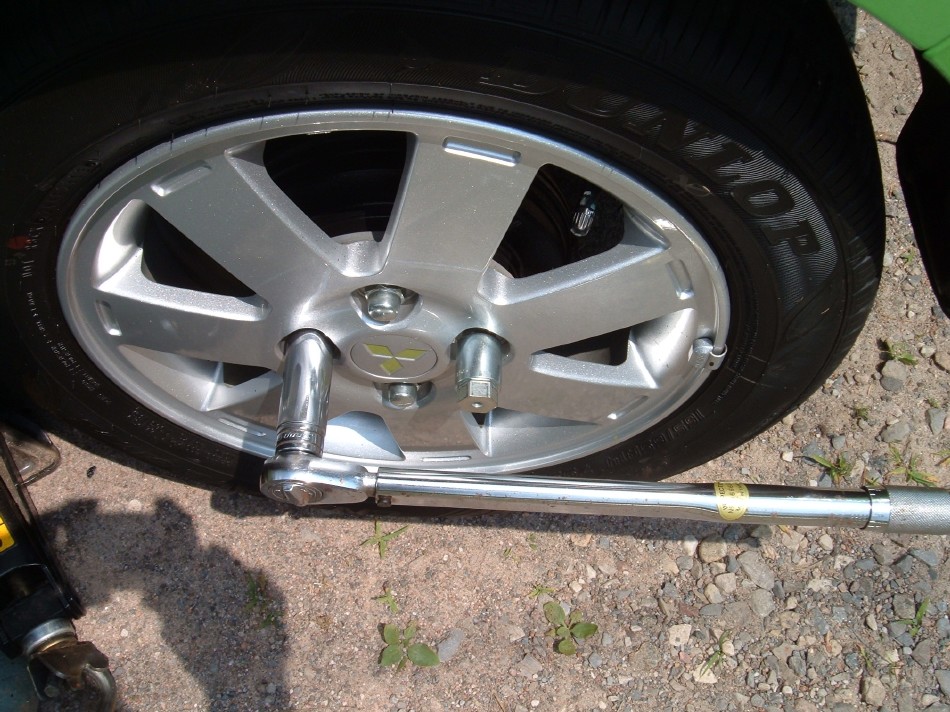
    Torque lug nuts to proper torque. (Minimum here at 65Ft/lbs)

    ----------------------------------------------
    Up next: We will tackle the front wheel wells!
    ----------------------------------------------

    ~CrazyJerry

    P.S. Working hard for a free window forum sticker!
    Last edited by CrazyJerry; 01-21-2019 at 10:17 PM. Reason: added torque specs

  2. The Following 5 Users Say Thank You to CrazyJerry For This Useful Post:

    cookiemonster (07-28-2014),Daox (07-28-2014),MetroMPG (07-28-2014),R01k (07-28-2014),spork (04-12-2016)

  3. #2
    Senior Member
    Join Date
    Nov 2013
    Location
    NE
    Country
    United States
    Posts
    548
    Garage empty: add car
    Thanks
    0
    Thanked 81 Times in 62 Posts
    Good looking dog . Mirage isn't so bad as well . Thanks for the photos of your project and nicely done .

  4. #3
    Member
    Join Date
    Jul 2014
    Location
    Colton, NY
    Country
    United States
    Posts
    39
    Garage empty: add car
    Thanks
    5
    Thanked 38 Times in 14 Posts
    Thanks cinder. In my 5 decades on the planet, I've had 50 cars but never a new one. Costing twice as much as my house I'm going to take really good care of it too! Should be quite a ride. Have a good evening!

    ~CrazyJerry

  5. #4
    P.S. Working hard for a free window forum sticker!
    You earned one right there!

    And what's the story of the white stripe? I like it.

        __________________________________________

        click to view fuel log View my fuel log 2014 Mirage ES 1.2 manual: 62.4 mpg (US) ... 26.5 km/L ... 3.8 L/100 km ... 74.9 mpg (Imp)


  6. #5
    Member
    Join Date
    Jul 2014
    Location
    Colton, NY
    Country
    United States
    Posts
    39
    Garage empty: add car
    Thanks
    5
    Thanked 38 Times in 14 Posts
    Quote Originally Posted by MetroMPG View Post
    You earned one right there!

    And what's the story of the white stripe? I like it.
    Great!!! Part II is on the way shortly....
    The dealer where I got the Mirage has these stripes on many of the cars there. The stripes are a contrasting but complimentary color (depending on the body color) and only appear on the bottom (nothing on the hood / roof / etc..). I'm guessing these are a local addition and not a factory option (although initially I thought they were...) There's a better pic at the end of Part II DIY. The trailing end of the stripe on the lower rear passenger doors spells out "MIRAGE" There is a break between the R and A and a palm tree is depicted... Between the color of the car and the addition of the stripe, I feel like I'm always on vacation (even though it's been decades since one of those!!)

    ~CrazyJerry

  7. #6
    Quote Originally Posted by CrazyJerry View Post
    The dealer where I got the Mirage has these stripes on many of the cars there. ... Between the color of the car and the addition of the stripe, I feel like I'm always on vacation (even though it's been decades since one of those!!)
    Thanks. like the palm tree too - nice touch.

        __________________________________________

        click to view fuel log View my fuel log 2014 Mirage ES 1.2 manual: 62.4 mpg (US) ... 26.5 km/L ... 3.8 L/100 km ... 74.9 mpg (Imp)


  8. #7
    Administrator Daox's Avatar
    Join Date
    Jan 2013
    Location
    Germantown, WI
    Country
    United States
    Posts
    4,999
    Thanks
    2,892
    Thanked 1,804 Times in 1,017 Posts
    Very nice write up. Thanks!
    Custom Mirage products: Cruise control kit, Glove box light, MAF sensor housing, Rear sway bar, Upper grill block

    Current project: DIY Nitrous oxide setup for ~$100

        __________________________________________

        click to view fuel log View my fuel log 2015 Mirage DE 1.2 manual: 47.2 mpg (US) ... 20.1 km/L ... 5.0 L/100 km ... 56.7 mpg (Imp)


  9. #8
    Member
    Join Date
    Jul 2014
    Location
    Colton, NY
    Country
    United States
    Posts
    39
    Garage empty: add car
    Thanks
    5
    Thanked 38 Times in 14 Posts
    Quote Originally Posted by Daox View Post
    Very nice write up. Thanks!
    You're very welcome and thank you for the kind words!
    I hope it will be of use to other Mirage owners too!
    ~CrazyJerry

  10. #9
    Member
    Join Date
    Jul 2014
    Location
    Colton, NY
    Country
    United States
    Posts
    39
    Garage empty: add car
    Thanks
    5
    Thanked 38 Times in 14 Posts

    Part II - DIY - Looking good for the long haul!

    Welcome back to Part II of the DIY - Looking good for the long haul!

    In Part I we took a closer look at the rear wheel well area and went the extra mile with some preventive maintenance to give it a better shot at looking good years from now.

    In Part II we'll take a similar approach to the front wheel well area.

    -----------------------
    ***DISCLAIMER***
    -----------------------
    What follows is the removal of the front wheels to get a better look at what we're dealing with. The procedures for this segment will be general and probably not all-inclusive so if in doubt about anything, ask questions or do a little research before you permanently disable your car or something more serious. In the same way there are those who should never carry anything sharper than a cotton ball, there are those that should never attempt to hands-on repair an automobile. Going one step further, please consider this writeup for entertainment purposes only - I assume no liability - CrazyJerry

    Moving on - Let's look at the the front wheel well area!

    --------------------------------------------------------------
    153 miles - Will this be a repeat of what we saw in the rear?
    --------------------------------------------------------------
    To answer this and other questions most folks are generally too disinterested to ask, we must remove the front wheels. For factory alloy wheels, A 1/2 drive 13/16 socket will fit both the lug nuts and the hex head for the anti-theft lug nut socket. Like the fasteners on the rear wheels, some lugs were incredibly tight, some cracked loose as expected. Raise the front wheel(s) off the ground in a safe manner and remove them.

    With a front wheel out of the way the initial inspection looks pretty decent:
    .

    .
    .
    The axle shafts could be cleaned up a bit though:
    .

    .
    .
    For this part of the project the front brake caliper and rotor should be removed. This is very easy to do and is a breath of fresh air compared to some setups I've worked with over the years. Tools needed will be a 12mm open end/closed end wrench or socket/ratchet, and 3/8" (or 1/2") drive ratchet and corresponding 14mm socket. The 12mm will be used to free the caliper brake line clamp, and the 14mm will be used to loosen/remove the two caliper retaining bolts. If you're not in love with the idea of having the rubber brake line support the weight of a dangling caliper, then find a one-gallon paint can or something similar in height to provide a temporary parking spot for the removed caliper.
    .

    .
    .
    The factory did a nice job greasing the caliper bolts so-much-so that when you attempt to pull them out, they may try to magically go back in. If you twirl them the entire time you are pulling them out you may lessen this effect. As you pull the bolts out, notice the shafts of both the upper and lower caliper bolts. The lower one in particular has a couple of rubber seals recessed into it - so try to remember that for reassembly (Which Witch is Which?). The brake pads are easily removed from the caliper by hand although a small screwdriver might be easier for some. And, since we will be painting the caliper, the caliper bolt boots (rubber) should be removed and set to the side. They are shown to the left of the brake pads in the photo below.
    .

    .
    .
    Caliper aside, the rotors should easily pull off by hand. All previously painted areas may need a good scrubbing with the gray scratch pad for cleanup and good paint adhesion. The non-painted areas (rotor braking surface, wheel studs, caliper piston dust seal and bleed cap, etc) should be taped up to avoid being painted. Paint is the same rattle can as used for the rear drums in Part I and I generously applied it to the rotors cooling fins.
    .
    **NOTE** I drive at the speed of really cold molasses so rotor cooling should not be an issue. If you are doing autocross or are a heavy-footed braker, skip painting the rotor's cooling fins.
    .
    Outer/curbside view:
    .

    .
    .
    Inner/backside view:
    .

    .
    .
    The caliper, backing plate and hub all got a blast of drab green rattle can paint. The camera makes it look yellow but it is a few shades different to off-set the car's actual color. In today's world it's no longer necessary for the carpet to match the drapes for something to look good. 
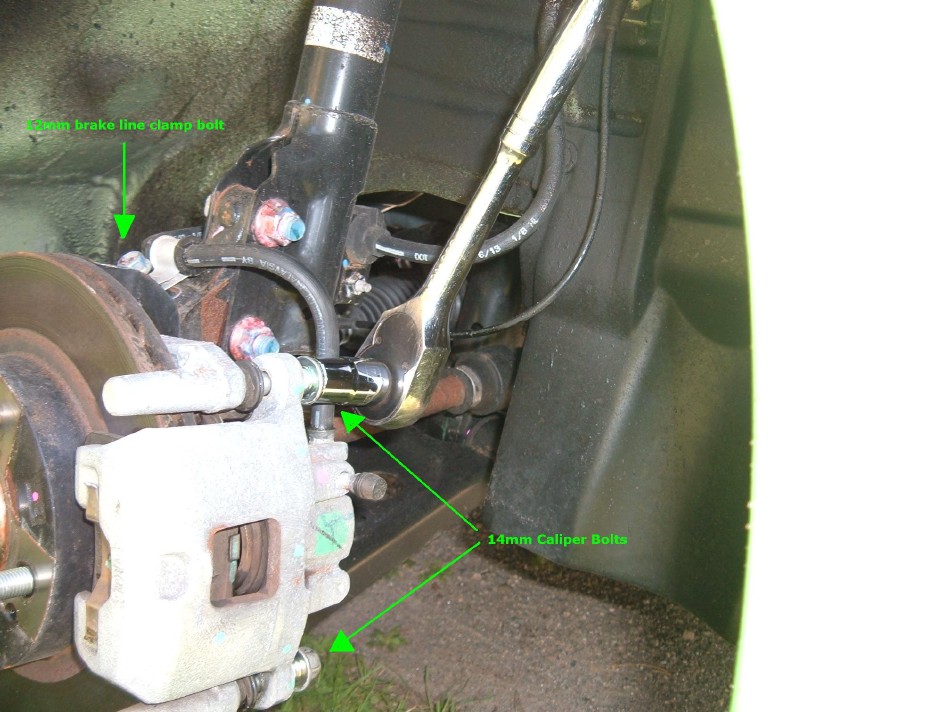
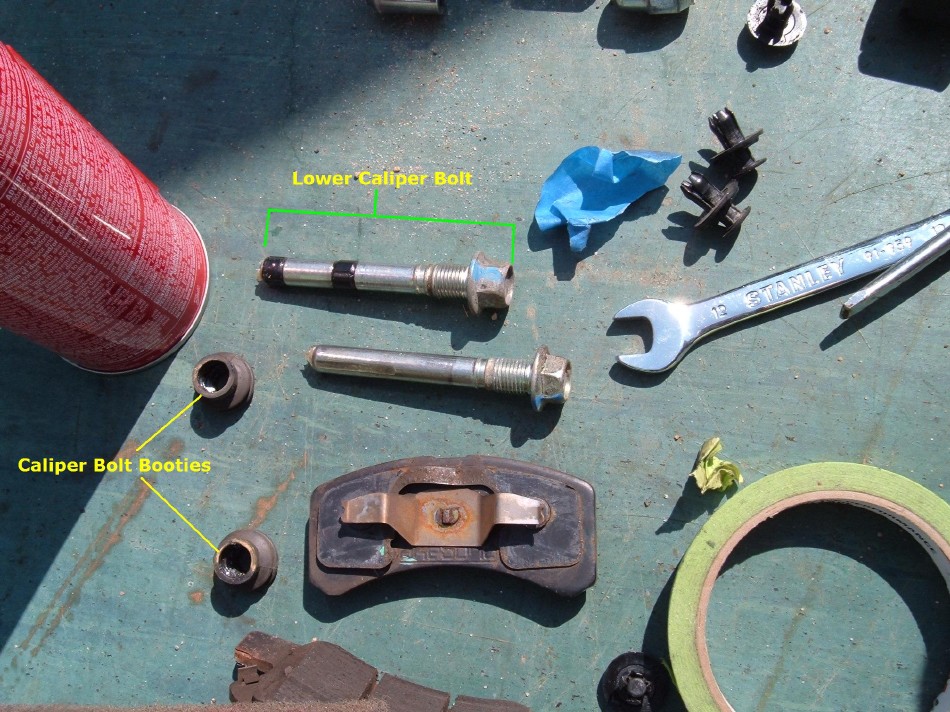
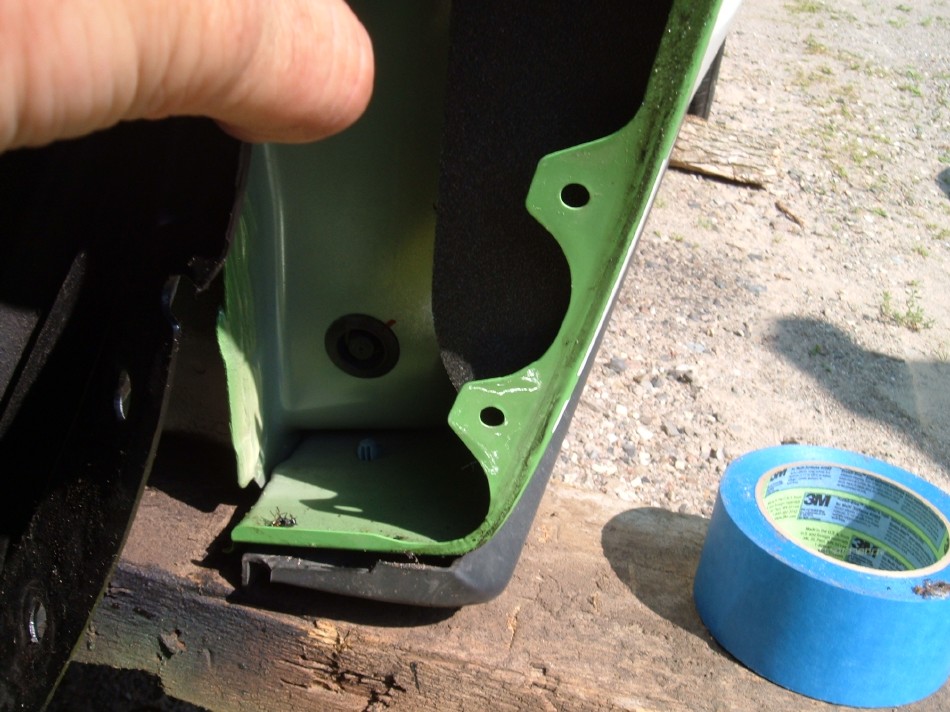
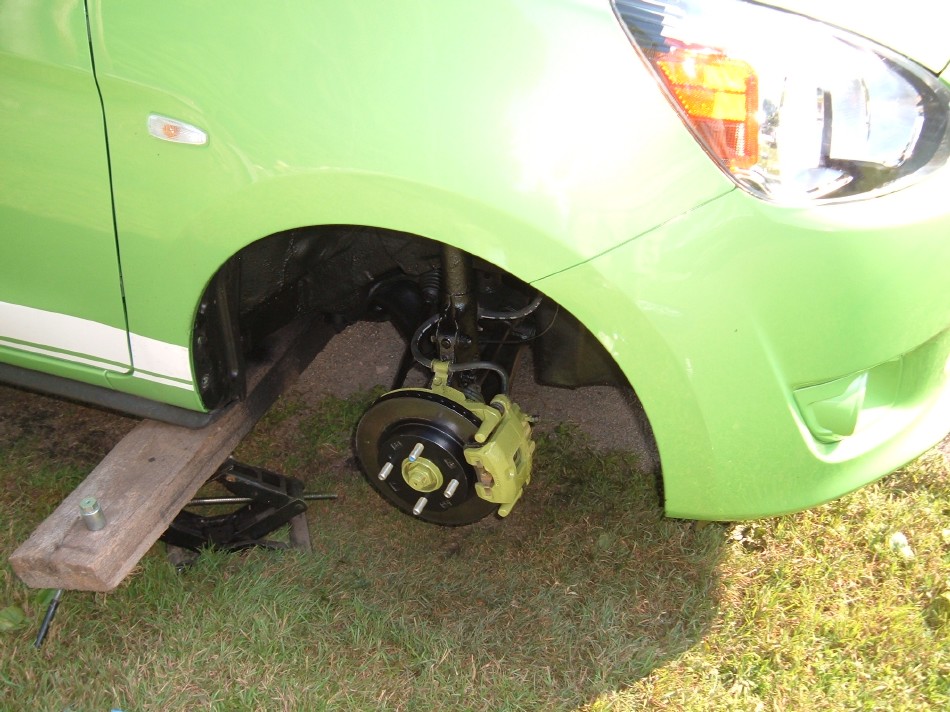
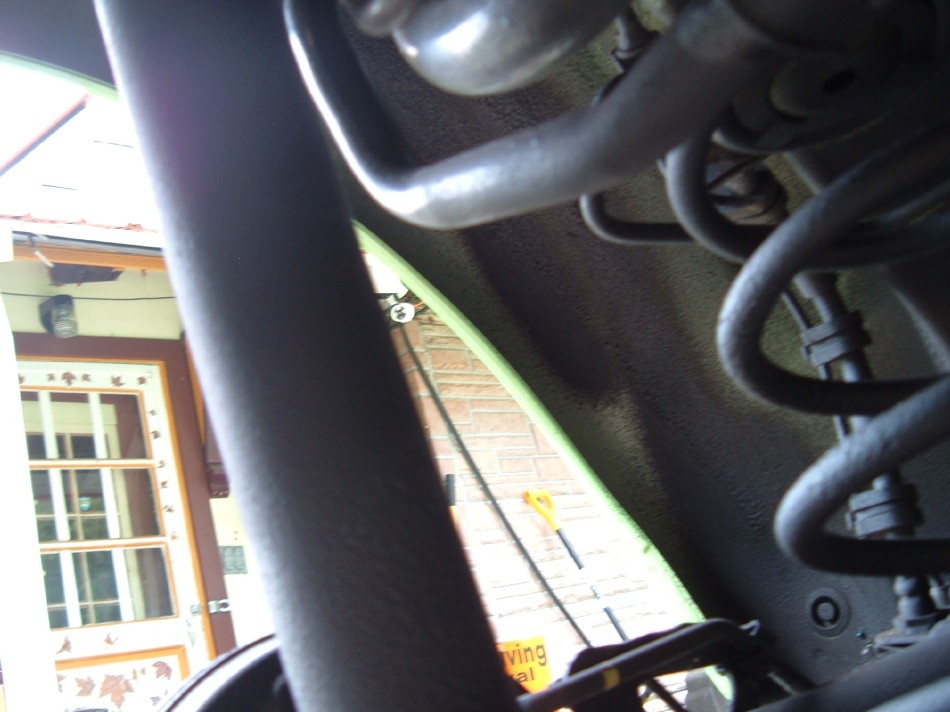
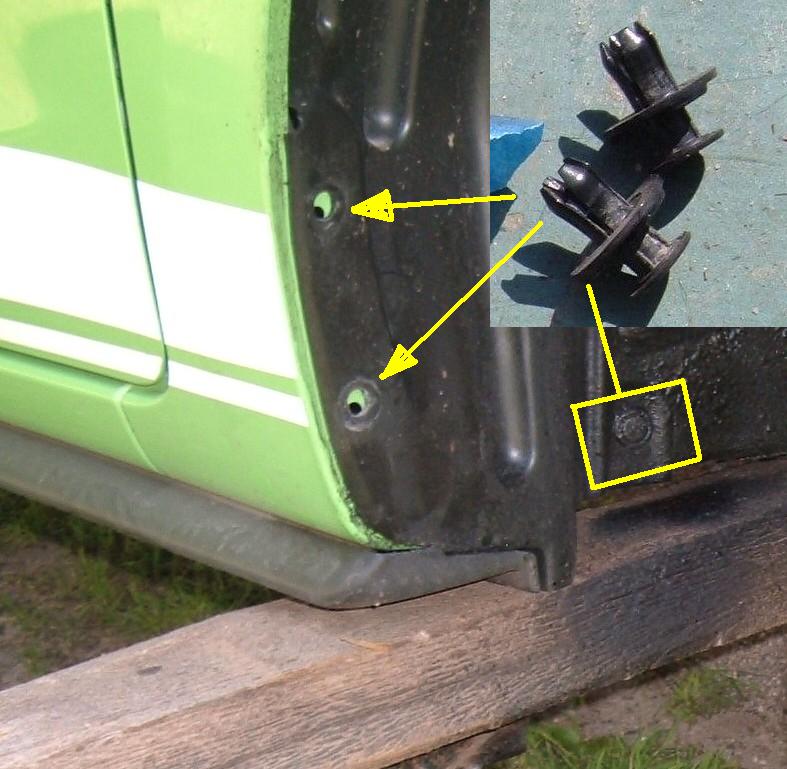
Tape off the items you do not want painted. More blue tape here for the rubber brake line, wheel studs, and caliper piston dust boot.. Also notice the lower plastic inner fender/splash shield (near where the mudflap would go) is now detached. (More on that in a second.)
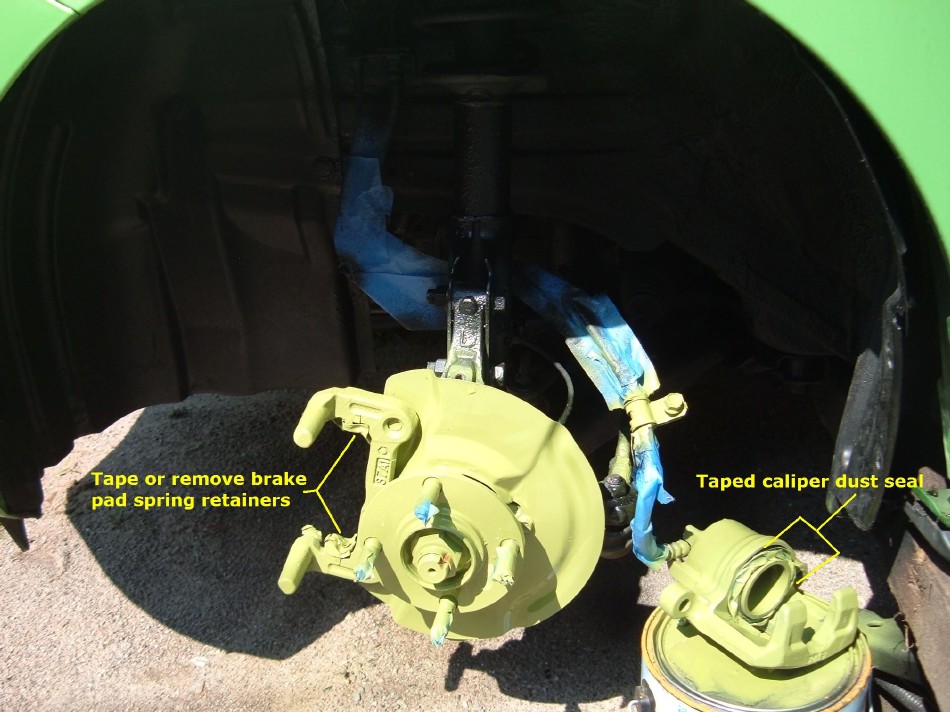
    .

    .
    .
    While the painted items are drying, let's take a look behind the inner fender splash sheild!
    A small screwdriver and a little finesse will allow you to pry each of the three plastic rivets heads up about 1/4 of an inch or so and then they can be pulled right out.
    .
    :
    .
    .
    Pulling the plastic sheild aside we can now look behind it.
    Nothing there except a dead fly!
    .

    .
    .
    Looking from the top of the fender down (with the hood open) you can see how accessible this area will be to falling debris like pine needles, leaves, etc.
    .
    Win-lose-or-draw, this pocket is going to get undercoated:
    .

    .
    .
    ***Note***
    Although I don't have a pic, if you shine a flashlight waaaaay up into the top of the inner front wheelwell, look up into the shock tower area, you may see it lacks undercoating. Surely the salt and sand from the spinning tire will be hurled up there. Give it a blast!
    .
    -------------------
    A da Vinci is born!
    -------------------
    The paint is dry and it's time to untape everything and reassemble. Don't forget to torque the front wheel lugs! (Minimum at 65ft/lbs here.)
    .

    .

    .

    .
    .
    The color on this digital da Vinci masterpiece doesn't look nearly as nice as the real McCoy. The finishing touch is the Mona Alloy's smile - the center cap Mitsubishi recess. Using just a bit more paint, we fill in that area and VOILA!
    .

    .

    .
    .
    All assembled and back where we started, this Mirage is now better prepared to battle the salt, sand, slush and slop of its first New England winter!
    .

    .
    Until next time, enjoy the drive and exceptional fuel economy in your Mitsubishi Mirage!!

    ~CrazyJerry
    Last edited by CrazyJerry; 01-21-2019 at 10:19 PM. Reason: added pic.. and another pic

  11. The Following 4 Users Say Thank You to CrazyJerry For This Useful Post:

    Charlie (07-30-2014),Donut (07-28-2014),MetroMPG (07-29-2014),ToXiQ (10-18-2014)

  12. #10
    Junior Member
    Join Date
    Jul 2021
    Location
    Warsaw, IN
    Country
    United States
    Posts
    1
    Garage empty: add car
    Thanks
    0
    Thanked 0 Times in 0 Posts
    Quote Originally Posted by CrazyJerry View Post
    The 12mm will be used to free the caliper brake line clamp, and the 14mm will be used to loosen/remove the two caliper retaining bolts.
    Do you know the torque to put this back in?

Posting Permissions

  • You may not post new threads
  • You may not post replies
  • You may not post attachments
  • You may not edit your posts
  •