Page 3 of 4 FirstFirst 1234 LastLast
Results 21 to 30 of 31

Thread: Converting my Mirage into a mini-camper, work station, and music studio

  1. #21
    Senior Member Dodge Aries K's Avatar
    Join Date
    Jan 2019
    Location
    IL
    Country
    United States
    Posts
    1,181
    Thanks
    0
    Thanked 383 Times in 265 Posts
    There are dummy load resistors that will make the car's airbag computer think they're okay but as to what resistance and all that I have no clue. Also, for the dumb capacitive airbag occupancy sensor... That's a whole different story. As for parts being removed, usually that shuts down the system and disables it. It won't cause it to go off but I think working safety equipment is pretty important in a car designed to have it.


    -Karl B. No Mirages currently...

  2. #22
    Member
    Join Date
    Jul 2020
    Location
    WI
    Country
    United States
    Posts
    85
    Thanks
    13
    Thanked 23 Times in 13 Posts
    Quote Originally Posted by Eggman View Post
    Keep in mind your passenger seat includes not only an occupancy sensor but an explosive squib for its airbag - both must be accounted for to the airbag controller.

    It's a clever approach, but those explosive devices are designed to work in a very carefully thought-out manner in a specific installation. This approach removes the explosive elements from their designed configuration, as you acknowledge below.

    Will your dealer will give you any advice on this? They risk a lot of liability in the case of injury due to your actions.

    Managing risk and liability is a high-stakes game. Imagine a lawsuit hearing where someone is injured or killed in an accident and the vehicle is modified. Lawyers will do their best to find out who did what to place the blame and collect all that they can. It's scary to think about.

    We're not talking about an old Ford with outdated safety systems here.
    I hear ya, I do. I appreciate the concern. Since there will be no passenger when the passenger seat airbag is removed, I personally feel fine driving around without it. As for me injuring or killing someone in an accident and getting sued....yes it is good to be prepared but not overly worried. I don't enjoy living with hesitation. I just do.

  3. #23
    Member
    Join Date
    Jul 2020
    Location
    WI
    Country
    United States
    Posts
    85
    Thanks
    13
    Thanked 23 Times in 13 Posts
    Today I fabricated my custom speaker brackets. They still need to be primed and painted, then they will be finished. I used a small slab of plywood that I was given for free at the audio store when purchasing my new sound system. If you're near Madison, WI and want very professional service without being upsold (the owner literally told me to make my own brackets and not pay him) go to AMS Audio.

    The bracket will be bolted to the speaker slot on the car door frame, and then the speaker will be screwed in on top of it. It might make more sense when I am finished with the install and post more pictures. It works just like the speaker bracket made by Scosche, except these will be much better secured to door resulting in better sound quality.

    I will be using Imgur for most picture/video uploads now on because that feature is absolutely garbage on this forum (sorry but it's just facts, stop forcing logout timers and add batch upload support).

    Click this link to see the entire process:
    https://imgur.com/a/6Ym6cPa

    Name:  Photo Sep 03, 11 12 12 PM.jpg
Views: 979
Size:  85.3 KB
    Last edited by WI_Mirage; 09-04-2020 at 04:50 AM.

  4. #24
    Any updates, WI Mirage?

        __________________________________________

        click to view fuel log View my fuel log 2014 Mirage ES 1.2 manual: 62.4 mpg (US) ... 26.5 km/L ... 3.8 L/100 km ... 74.9 mpg (Imp)


  5. #25
    Senior Member
    Join Date
    Jan 2015
    Location
    Vancouver, BC
    Country
    Canada
    Posts
    415
    Thanks
    208
    Thanked 80 Times in 47 Posts
    cool thread!
    2014 White SE with CVT

  6. #26
    Senior Member
    Join Date
    Oct 2015
    Location
    Halifax, Nova Scotia
    Country
    Canada
    Posts
    127
    Thanks
    27
    Thanked 62 Times in 44 Posts
    Quote Originally Posted by WI_Mirage View Post
    So today I started working on the doors. Well, just one door lol. This weekend I'll put putting in a lot of work.

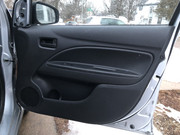
    Removed the trim panels. Moved the wires out of the way. Removed the plastic water/dust cover. I will be saving this and reusing it.
    Attachment 19125
    Attachment 19126

    I removed the black adhesive. I used a utility knife blade to run it flat across the metal, doing my best not to scratch paint off. Then I rubbed it off with goo-gone. And cleaned the whole thing with 99% rubbing alcohol.
    Attachment 19127

    Here I used a transparent adhesion film as a template. It is used to cover photos and documents, but it worked so damn well for this. I bought it at Michaels.
    I applied the film flat; not shaping it to the contour of the metal. That's just too much work lol. I traced all the holes, bolt heads, and some plastic clip thingy-ma-giggies with a black sharpie.
    Attachment 19128

    I taped 3 mats of sound deadener together. With the help of my awesome roommate, we applied the film to the aluminum foil side of the sound dampener. This is done because the film can be easily peeled off without damaging the foil or the film. I will use this same template for the front passenger doo. It will be applied to the other side of the sound dampener (so it's mirrored) which is a paper material that will stay attached to the film like when trying to peel a stubborn paper sticker.
    Attachment 19129

    I then used a utility knife to cut the shape of the rectangle template. The excess pieces can be used elsewhere.
    Attachment 19122


    Using an exacto knife, I meticulously cut out all the shapes. I threw away all the smaller pieces but kept the larger ones to be used on the inner metal of the door. After this was done, I cut the film template into 3 pieces using the edges of the sound dampening mats. I removed the film and applied it to three other sound dampening mats to be used for the passenger door.
    Attachment 19123

    I applied the mats one at a time. They didn't fit exactly perfect, but very damn close. I used the exacto knife the trace the holes that were slightly being covered. The sun had set before I could finish. I still have to apply some more to the bottom fourth of the door, and to the inner metal.
    Attachment 19124
    On an entirely unrelated note, looks like my dent should be able to be fixed with PDR using the pictures you posted... the guy at the repair shop said there would be a crash beam in the way, but looks wide open to me!

  7. The Following User Says Thank You to javensbukan For This Useful Post:

    inuvik (09-30-2020)

  8. #27
    Quote Originally Posted by javensbukan View Post
    On an entirely unrelated note, looks like my dent should be able to be fixed with PDR using the pictures you posted... the guy at the repair shop said there would be a crash beam in the way, but looks wide open to me!
    Nope, there’s not much metal
    In these doors Attachment 19385

        __________________________________________

        click to view fuel log View my fuel log 2014 Mirage SE wussie cvt edition. 1.2 automatic: 37.7 mpg (US) ... 16.0 km/L ... 6.2 L/100 km ... 45.3 mpg (Imp)


  9. #28
    Senior Member
    Join Date
    Jan 2015
    Location
    Vancouver, BC
    Country
    Canada
    Posts
    415
    Thanks
    208
    Thanked 80 Times in 47 Posts
    Same for the fenders. Tin foil.
    2014 White SE with CVT

  10. #29
    Member
    Join Date
    Jul 2020
    Location
    WI
    Country
    United States
    Posts
    85
    Thanks
    13
    Thanked 23 Times in 13 Posts
    Sorry for disappearing!
    Here are some updates.

    Installed more sound dampener inside the door on the outer sheet-metal, and then installed closed-cell membrane on top of it. Didn't save any pictures since it was hard to get a quality picture of the inside of the door.


    Painted the speaker brackets black.


    I installed the same closed-cell membrane on the door speaker mount, and the speaker bracket.


    I installed the speaker bracket onto the door, along with more membrane. I used stainless steel bolts for this, with washers and nuts on the inside of the door. I loosely tightened all 3, then rotated the bracket into the slots, then tightened.


    Then I installed the speaker. I used the speaker as a template to mark the 4 holes. I drilled pilot holes, and then used wood screws to install the speaker.


    I finished installed the sound dampener on the door. TIP FOR ANYONE DOING THIS, YOU DON'T NEED TO CUT OUT THE DAMPENER TO FRAME, LIKE I DID. You can if you want, but it's not required. The gaps must be covered for proper sound quality. The sound is supposed to only come out of the speaker, not through to back of the speaker and out of the gaps. The method I did is not typical, as I didn't understand this before doing it. My method will reduce more vibrations through the metal, but it's really not worth the time that it took. Just slap entire pieces on there without contouring it to the doors shape. Leave it flat.


    So for now I'm probably finished with sound dampening. It's cold outside and this stuff sucks in the cold (have to use a heat gun, tar becomes runny and sticks to the rolling tools, just adds extra steps and wastes time).

    My landlord just removed some carpet. I cut out a chunk to use as a trunk liner. Might be temporary, might not be. This project is giving me a greater appreciation of when it is appropriate to cut corners. I might have OCD, idk, but I definitely have a perfectionist attitude that sucks away my time. Corners shall be cut! I'll post pics of that when it's finished.

  11. The Following User Says Thank You to WI_Mirage For This Useful Post:

    El Kapitan (01-21-2021)

  12. #30
    Member
    Join Date
    Jul 2020
    Location
    WI
    Country
    United States
    Posts
    85
    Thanks
    13
    Thanked 23 Times in 13 Posts
    I installed some free indoor carpet as a temp, maybe permanent, trunk liner. I would prefer a black color carpet, but this had been removed from a room where I rent so it was very convenient. I used the bolts & carriages for the rear seats and rear belts to secure the carpet. So that makes this a 100% free mod. I still have to seam the edges and put a couple trim pieces back into place. So it will end up costing me something, but not much.

    Name:  IMG_0059.jpg
Views: 613
Size:  94.2 KB
    Name:  IMG_0060.jpg
Views: 595
Size:  100.2 KB
    Name:  IMG_0062.jpg
Views: 549
Size:  95.2 KB
    Name:  IMG_0065.jpg
Views: 606
Size:  96.5 KB


  13. The Following 2 Users Say Thank You to WI_Mirage For This Useful Post:

    El Kapitan (01-24-2021),inuvik (01-23-2021)

Tags for this Thread

Posting Permissions

  • You may not post new threads
  • You may not post replies
  • You may not post attachments
  • You may not edit your posts
  •