That looks really excessive on a virtually new car. :/


That looks really excessive on a virtually new car. :/


Agreed. If rust is a concern (and you plan to keep the car a long time), I would take matters into your own hands and not rely on the warranty.
Keep rust prone areas as clean as possible, and have rust inhibitor professionally applied, or DIY:
__________________________________________
![]() View my fuel log 2014 Mirage ES 1.2 manual: 62.4 mpg (US) ... 26.5 km/L ... 3.8 L/100 km ... 74.9 mpg (Imp)
View my fuel log 2014 Mirage ES 1.2 manual: 62.4 mpg (US) ... 26.5 km/L ... 3.8 L/100 km ... 74.9 mpg (Imp)
Fear not, that isn't a picture of actual rust. That is just the sand from the roads that gathered there. A quick blast in the car wash cleared it right out, and it was nice and shiny again.Originally Posted by fusion210

My mistake!


I coat it with undercoating tar based spray. 1 arch use 2 cans (300ml x 2 cans). Should be thick enough,...
2013 Honda Vario CBS VB
2014 Mitsubishi Mirage CVT EGM
2015 Toyota Innova 2.5V AT SMM
2013 Proton Preve CFE CVT PW
2013 Mitsubishi Outlander Sport PX CVT PW
2016 Mitsubishi Pajero Sport Dakar AT TGM Limited
__________________________________________
![]() View my fuel log 2014 Mirage Exceed 1.2 automatic: 39.0 mpg (US) ... 16.6 km/L ... 6.0 L/100 km ... 46.8 mpg (Imp)
View my fuel log 2014 Mirage Exceed 1.2 automatic: 39.0 mpg (US) ... 16.6 km/L ... 6.0 L/100 km ... 46.8 mpg (Imp)


100.000 miles ... that would be 4 years for me
__________________________________________
![]() View my fuel log 2013 Mirage 1.0 manual: 47.5 mpg (US) ... 20.2 km/L ... 5.0 L/100 km ... 57.0 mpg (Imp)
View my fuel log 2013 Mirage 1.0 manual: 47.5 mpg (US) ... 20.2 km/L ... 5.0 L/100 km ... 57.0 mpg (Imp)

I steam cleaned the brand new car, removed the front and rear clading ("bumpers"), the wheel linings, and sprayed everything underneath and not normally visible with transparent spray paint. Of course sparing the brake discs, exhaust, and so on.
Then I sprayed inside the hollow parts underneath, and the other cavities including the doors etc with the same transparent paint. After it fully dried a few days later, the cavities got some wax cavity spray, especially in the places where water stays. The creases in the edges around the bottom of the doors, for example. I will repeat waxing the cavities in a few years time.
The reason for this being that in winter the roads are just full of salt in these parts. Once the salt has gotten a hold on it, its too late to stop it, all you can do it to slower the inevitable decrepity.
davidricardo86 (02-23-2015),Teasmade (02-23-2015)

I don't suppose you took any pictures, or can describe how to remove the front and rear bumpers without damaging them, do you? I had to remove my bumper on my current car and I managed to crack the paint when I tried to prise it from the internal clips on the wings- I think the mirage uses the same type of clips?
__________________________________________
![]() View my fuel log 2014 Mirage 3 CVT 1.2 automatic: 47.9 mpg (US) ... 20.4 km/L ... 4.9 L/100 km ... 57.5 mpg (Imp)
View my fuel log 2014 Mirage 3 CVT 1.2 automatic: 47.9 mpg (US) ... 20.4 km/L ... 4.9 L/100 km ... 57.5 mpg (Imp)
HOWTO remove the front and rear "bumpers" (from memory):
The front bumper (actually just the cladding) goes off like this.
Two bolts have to go off, one in the left and one in the right part of the black part of the "bumper" visible from the front. You need either a size 12 or 14 wrench, dont remember which. Then remove the inner wheel linings, those half-round black plastic things around the front wheels. They are clipped on with fasteners, and these need to be used again later, so dont wreck them. After that look at the pointy tip of the bumper pointing into the wheel housing. Another fastener there. There are fasteners all around the perimeter of the bumper waiting to be taken off. Put some carton on the floor under the bumper before taking all the fasteners off, and have a second person hold it to the car. When all fasteners are off, the bumper simply comes off forward, and readily without any force. Have a second person hold it onto the car, and take it off very slowly so you dont get scratches. Actually very easy and simple once you've done it.
How to remove the rear bumper:
More or less as the front, but with a few minor differences.
Remove both taillights first, just as if you needed to chang a bulb.
There two bolts, one on either side now becoming visible. They need to come out.
Remove the inner fender linings, the lining around the rear wheels. They are clipped with fasteners. The pointy top parts of the bumper, pointing into the left and right wheel housing has one fastener each end.
I dont remember if the numberplate-lights have to come off now, or if they are mounted on metal, but I think there on metal and can be left be.
Now all other fasteners have to come off. Just as with the front bumper, have someone help you in order not to avoid making any scratches.
Note:
On the front and also on the rear bumper, you need zero force to actually take them off once all fasteners are off. Actually the bumpers will probably fall off and get scratched if a second person doesn't hold the bumper in place. If it won't readily come off, you've forgotten a fastener somewhere. Its all very easy once you've done it, and shouldnt take more than five minutes.
Last edited by foama; 02-23-2015 at 12:27 PM.
Eggman (11-27-2016),mohammad (05-01-2022),Teasmade (02-23-2015),Tinker1980 (03-05-2015)
That's brilliant - Thanks Foama! Will come in useful when I get mine - eventually!!
__________________________________________
![]() View my fuel log 2014 Mirage 3 CVT 1.2 automatic: 47.9 mpg (US) ... 20.4 km/L ... 4.9 L/100 km ... 57.5 mpg (Imp)
View my fuel log 2014 Mirage 3 CVT 1.2 automatic: 47.9 mpg (US) ... 20.4 km/L ... 4.9 L/100 km ... 57.5 mpg (Imp)
 Posting Permissions

 Reply With Quote
 "Global Small" Concept
 Even Fancier Metro (Mirage #2)
 Fancy Metro (Mirage #1)
 Loaner #1 from Mitsubishi
 Loaner #2 from Mitsubishi
 Mirage #3: Appliance Car
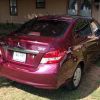 Dionysus
 FatMira
 Eleanor
 Snowy
Snowy 2014 Mitsubishi Space Star (Mirage) 1.0L